Quotes To Remember

Hello.

Today, I'm sharing a couple quotes that I hope will inspire solicitousness and help to instill a benevolence towards those that surround us. Kindness, graced upon all living things, is an absolute moral imperative and every once in a while...a reminder is warranted. 

Produce On Parade

Life. It will always be full of surprises, no matter how heedful one instinctually is. Bask in the warmth of happiness, but open yourself to the weight of inexorable tragedies and sorrows. There's lessons and insight to be gained, but only if you allow them.

And that is the truthest of truths. Stay on your on your toes, my friends. 

Wishing you happiness and peace,

               - Katie

Homemade Bagels and What I Learned

This weekend, it was finally time. Bagel time. I've been saying, "I'm going to make bagels this weekend!" for like...four weekends in a row now. 

Produce On Parade - Homemade Bagels and What I LearnedBut, the bagels will have to wait just a minute while I share this common sense quote. Today, I stumbled across this and I thought it was just so simple, honest, and matter-of-fact that I had to share. 

Produce On Parade - Homemade Bagels and What I Learned

Duhhhhhhhhh. If you love animals, don't eat them! Would you eat your beloved dog or cat? I hope not. This quote in its plainest offering makes sense, right? Yes. That's about all there is to it. So, thank you Morrissey!

And now, back to bagels. This was my first time making bagels and boy did I learn a thing or two (the hard way). Read this post and you won't make the same mistakes I did. Here's what I learned:

  • Knead the dough until it's smooth and shiny. 
  • Shaping the dough correctly is terribly important.
  • Bagel dough doesn't really rise. 
  • Remove the bagels from the boiling water with a mesh strainer...not two slotted spoons. 

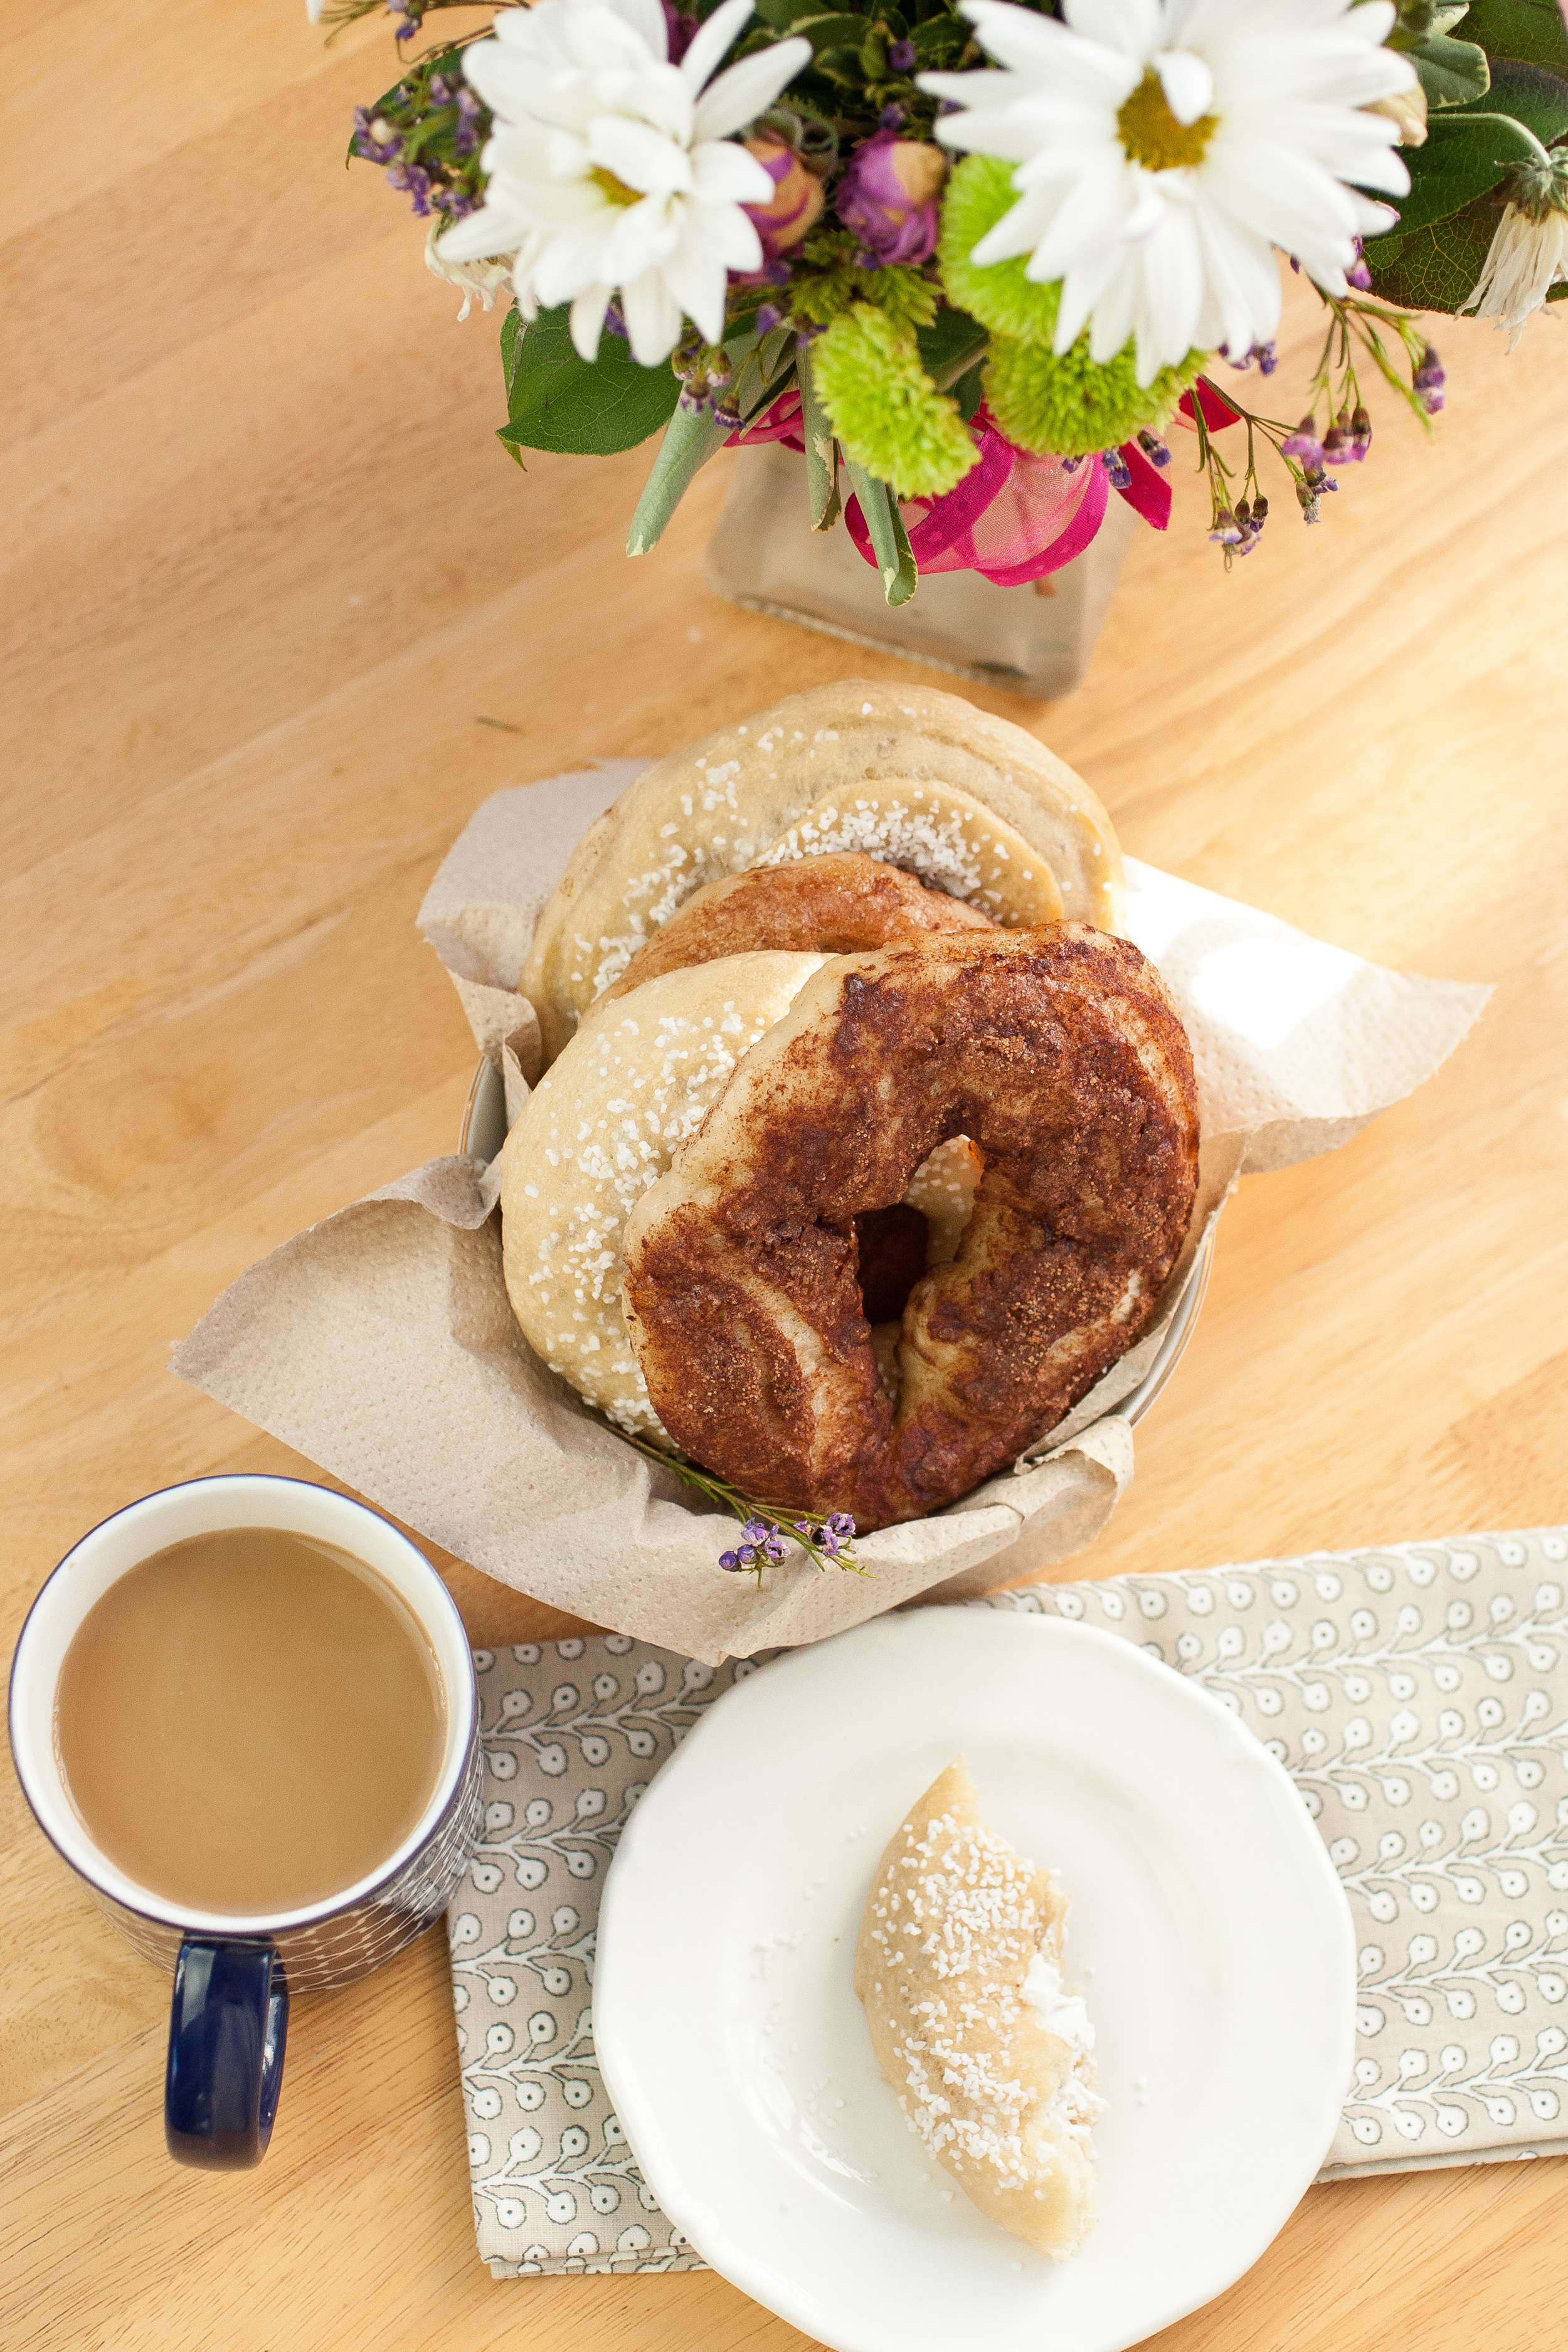
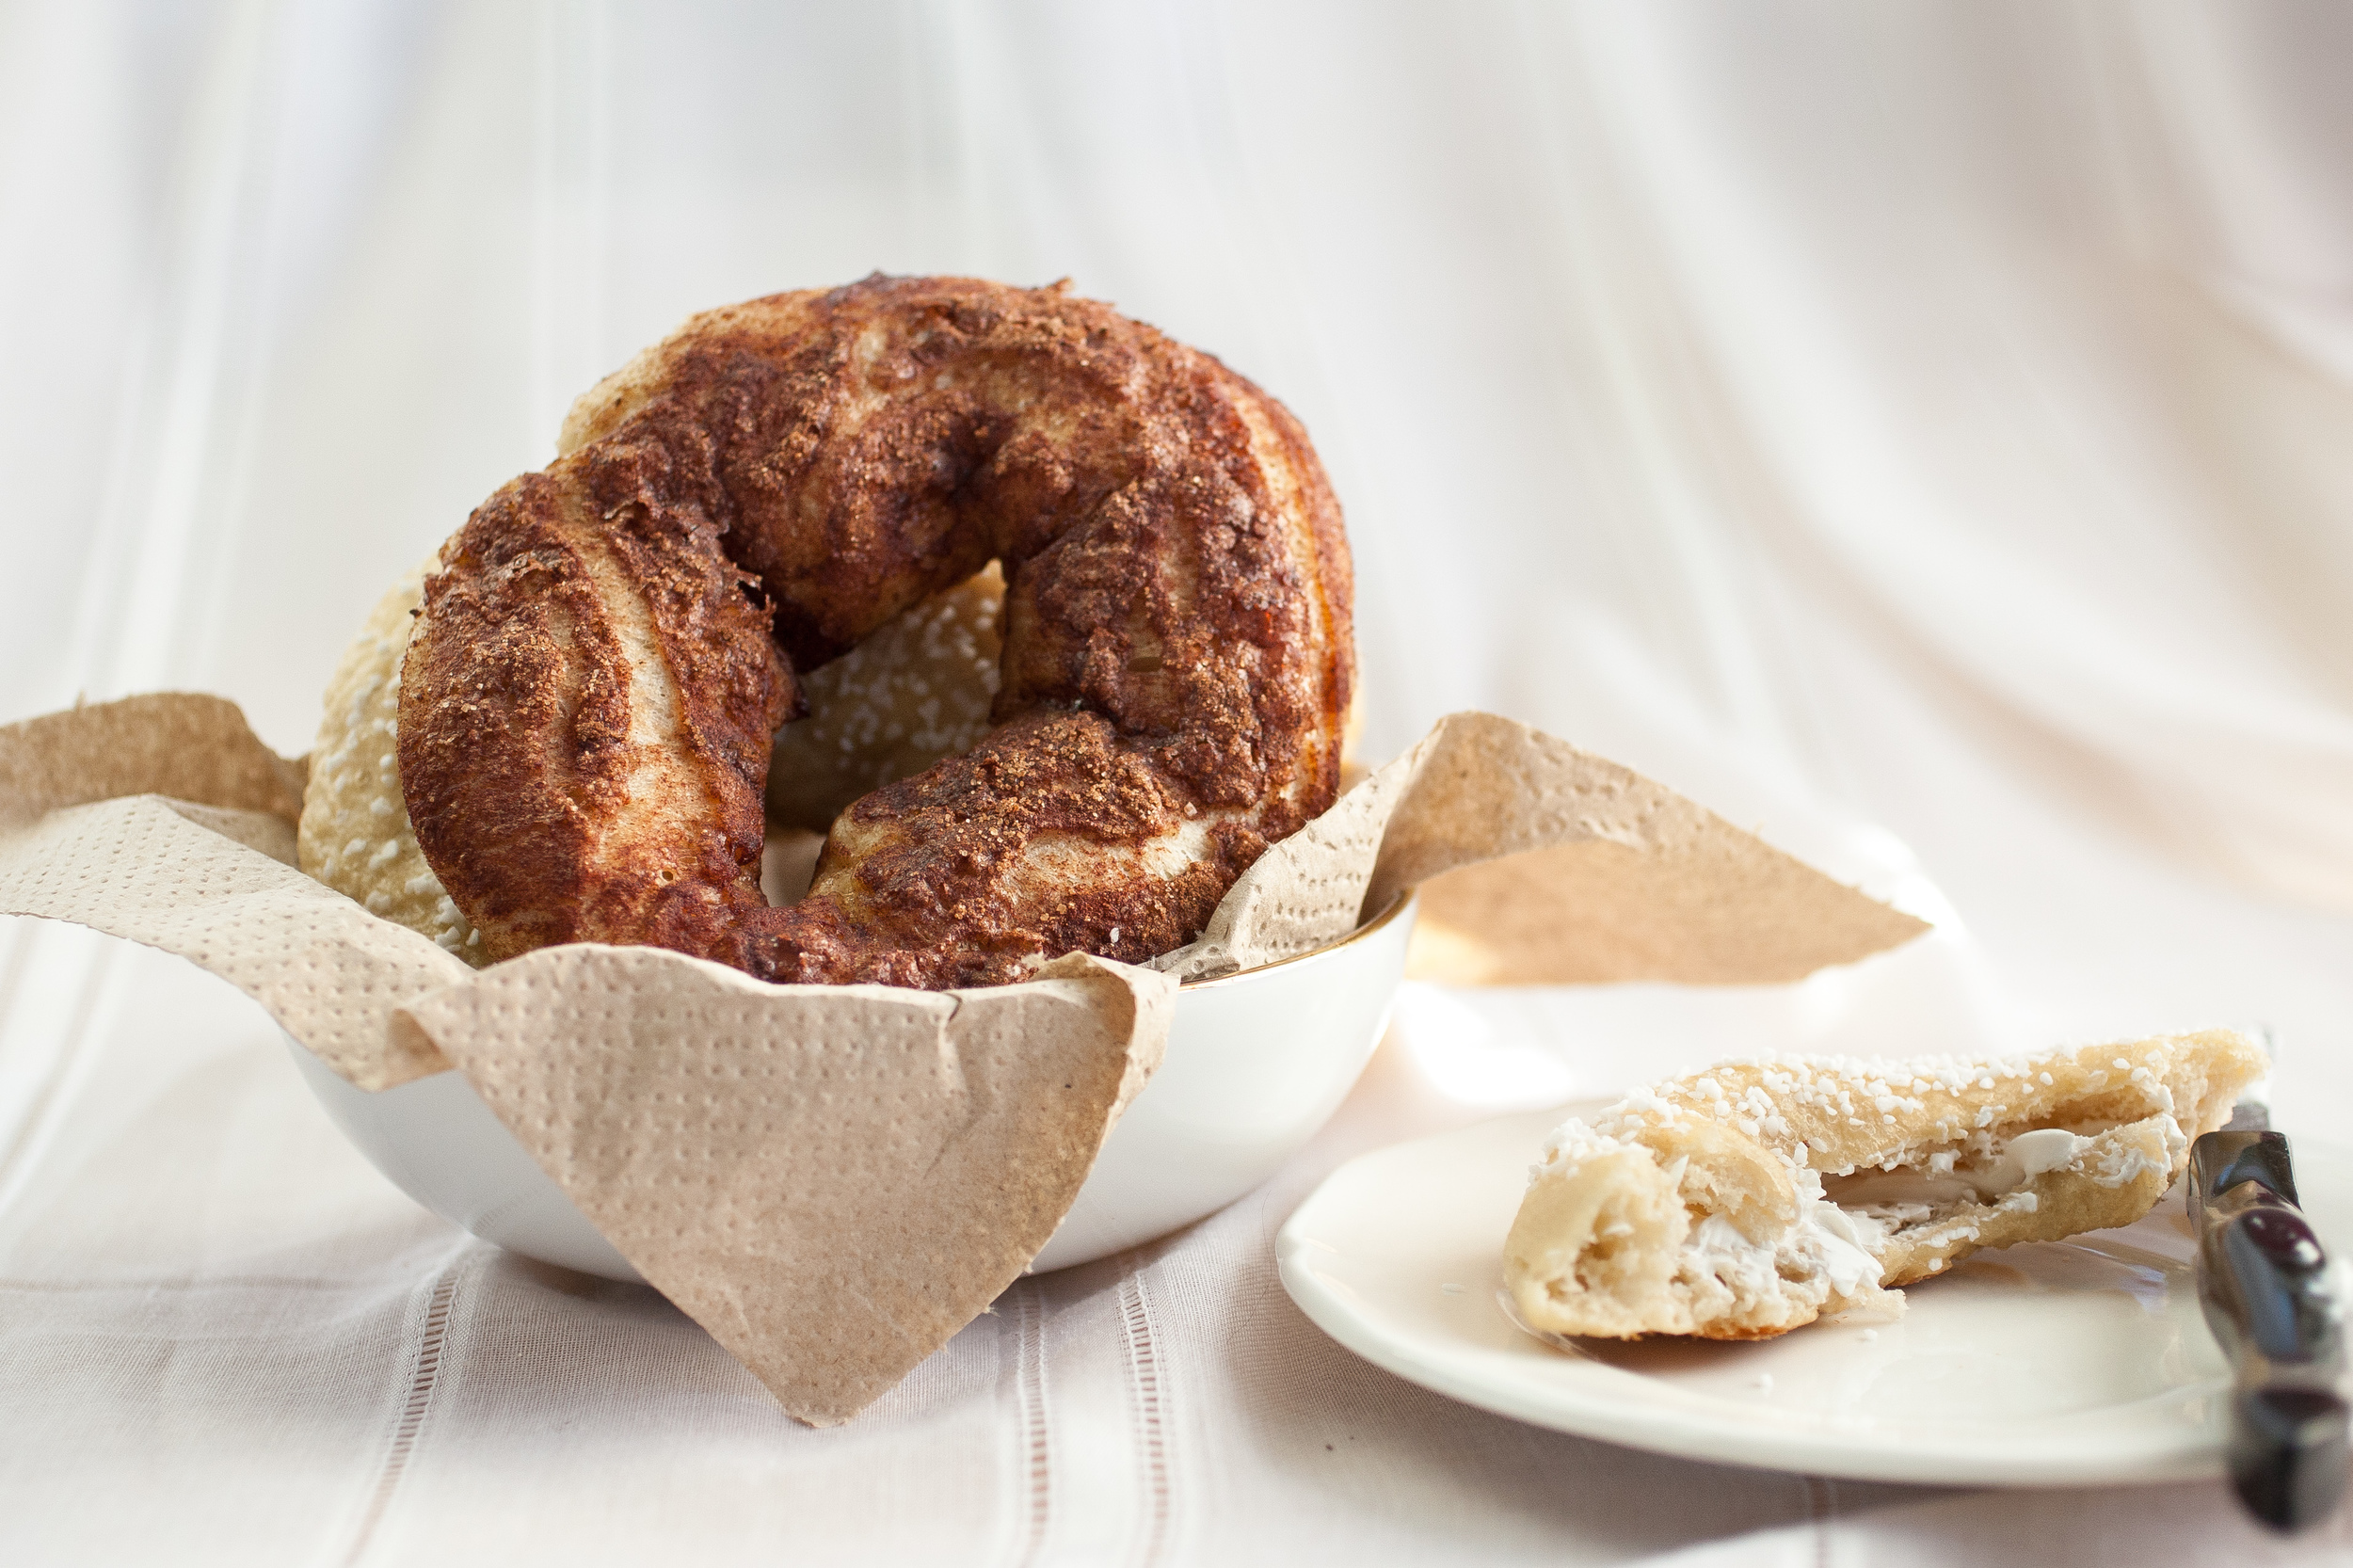
Chewy, dense, and slightly sweet, these bagels are what's up. If you're new to making bagels don't miss out! 

Produce On Parade - Homemade Bagels and What I LearnedHomemade Bagels 

Makes 8 Bagels

Notes: If you can't find barley malt powder, barley malt syrup can be used as well. I really can't recommend making the bagels without either. It's what gives bagels that "bageliness". I found my powder at a local health food store, but it can be found online as well. Or, if you're feeling like a rebellious I suppose one could use agave nectar, but seriously just but some barley malt powder or syrup. It's definitely worth it. 

  • 4 cups bread flour (or other high-gluten flour)
  • 2 tsp. salt
  • 1 Tbsp. barley malt powder
  • 1 1/2 tsp. dry active yeast
  • 1 1/4 cup lukewarm water
  • 1 Tbsp. additional barley malt powder
  • toppings (we did cinnamon sugar as well as salt bagels)

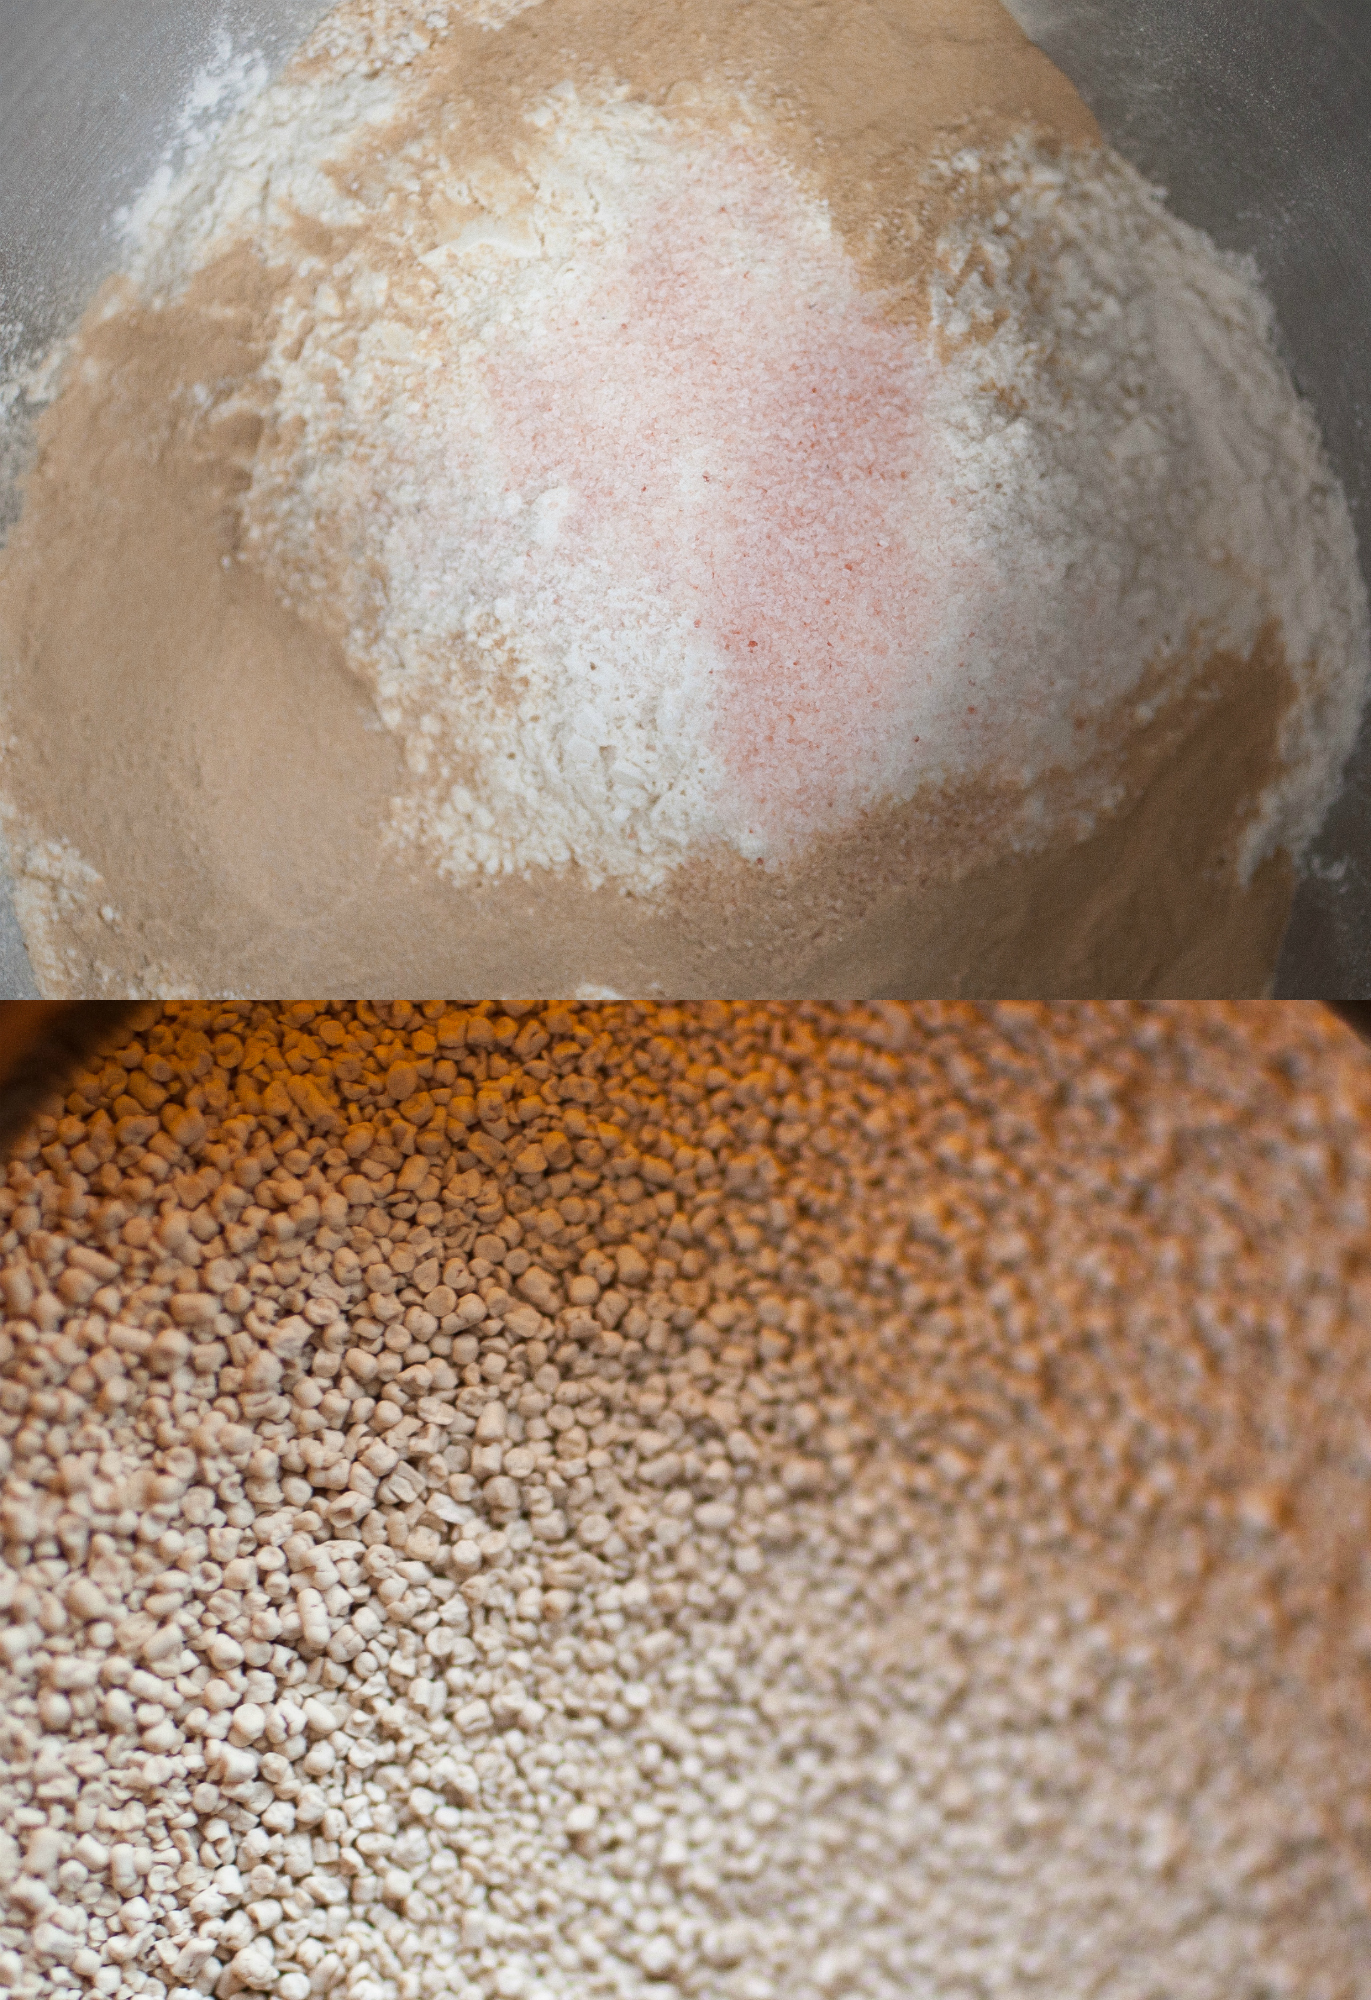
In a large electric mixing bowl, whisk together the flour, salt, and 1 Tbsp. barley malt powder. 

Produce On Parade - Homemade Bagels and What I LearnedProduce On Parade - Homemade Bagels and What I LearnedAttach the dough hook and using the lowest speed possible (stir), add in the yeast and the water. Mix for about 4 minutes. Increase the speed to the next level (2), and mix for about 10 minutes. 

Produce On Parade - Homemade Bagels and What I Learned
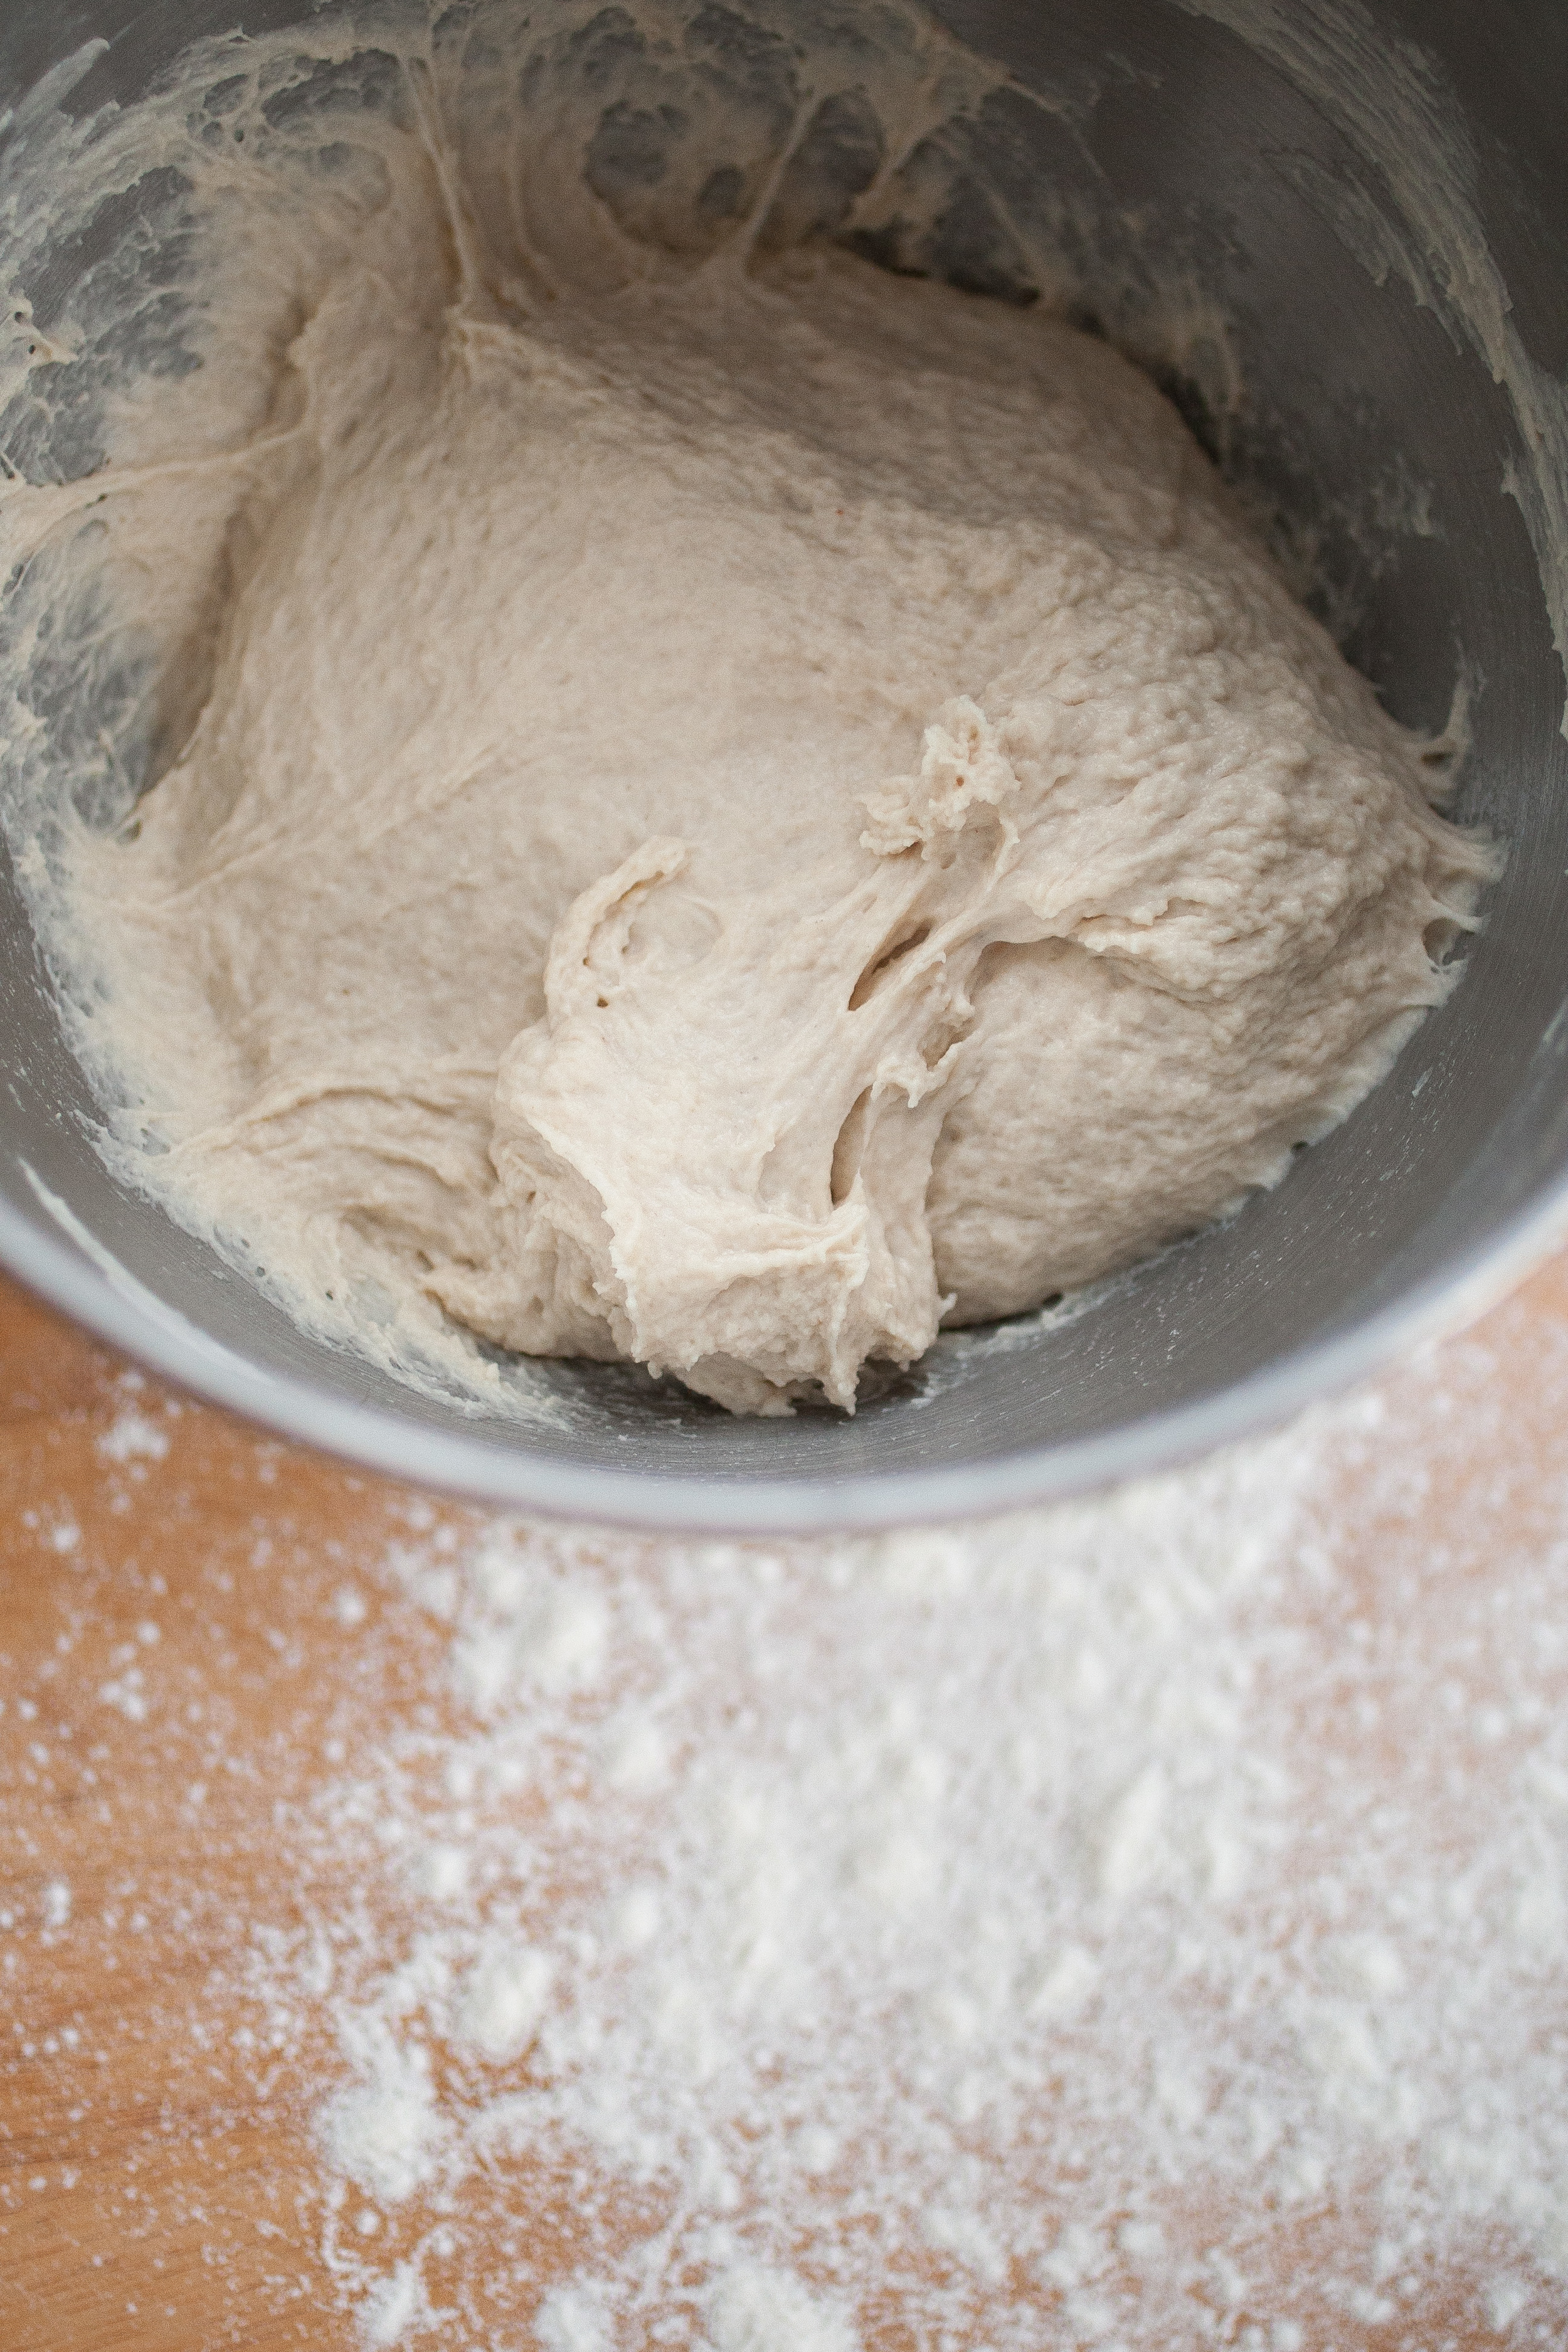
Turn the dough on a lightly floured surface. The dough will be a bit sticky. Knead until the dough shapes a smooth and shiny ball. 

Divide into 8 equal balls (each about 4 oz.), and place on a baking sheet. Cover with saran wrap and a towel. Allow to rest for 5 minutes.

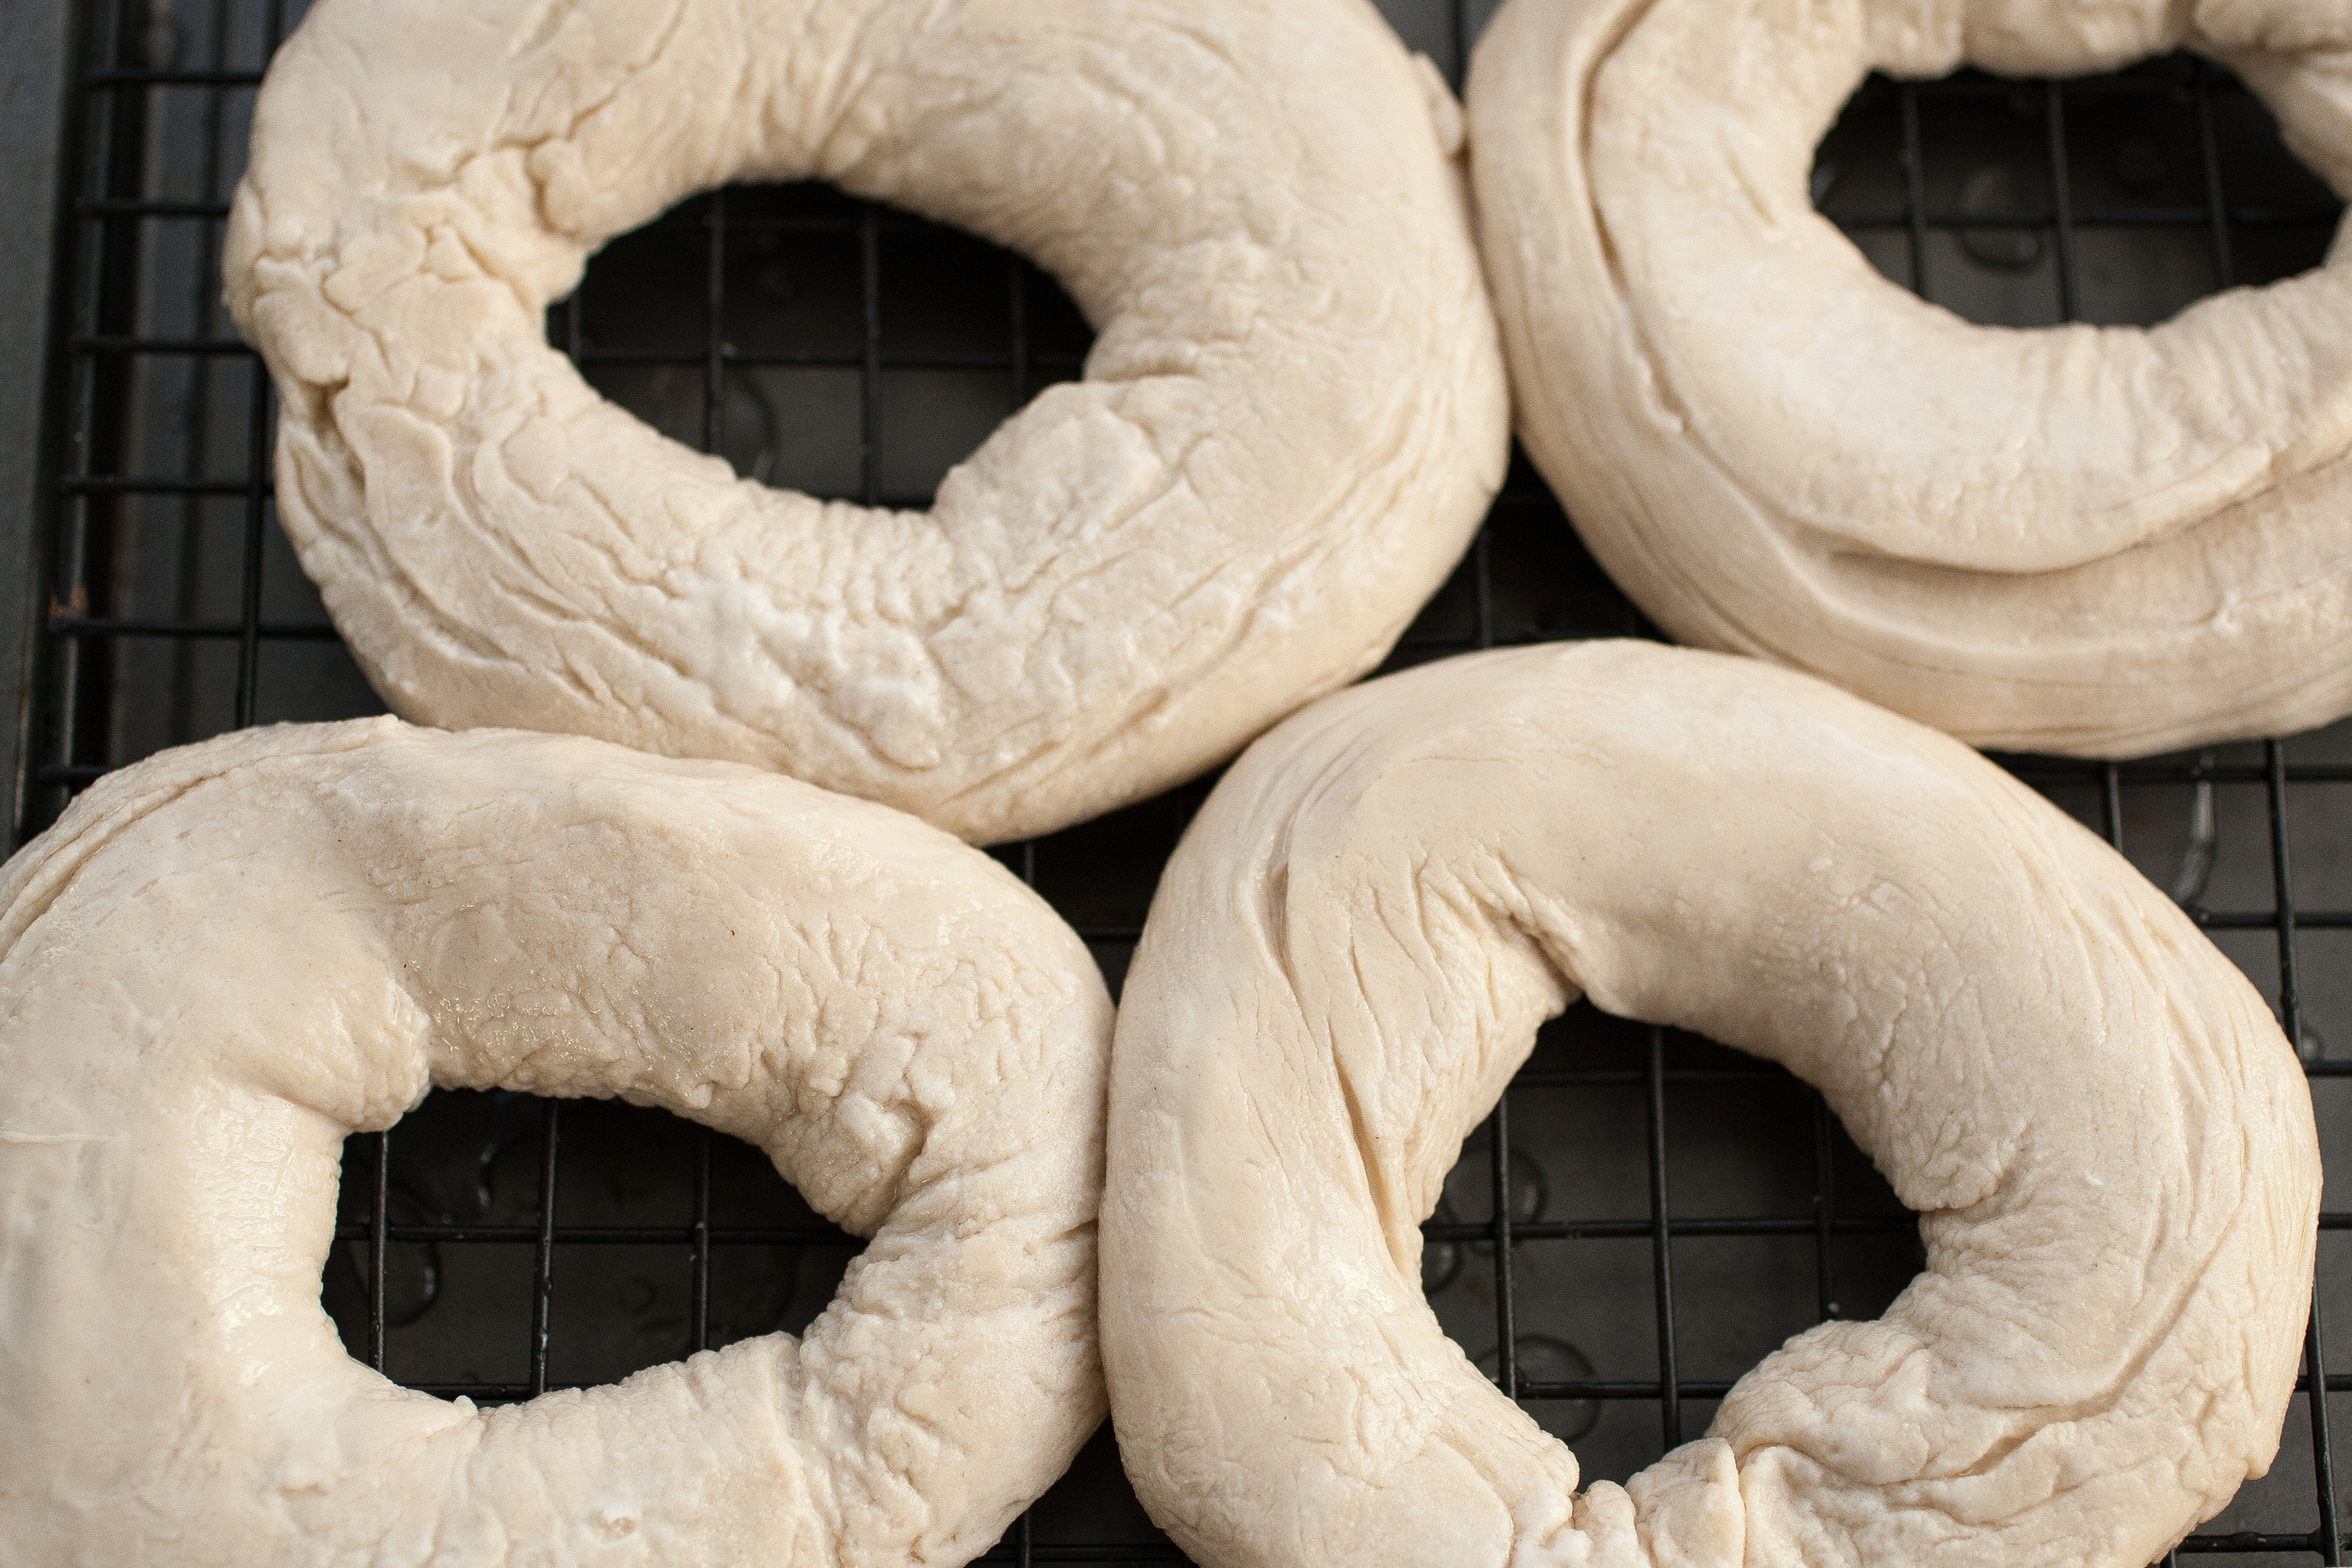
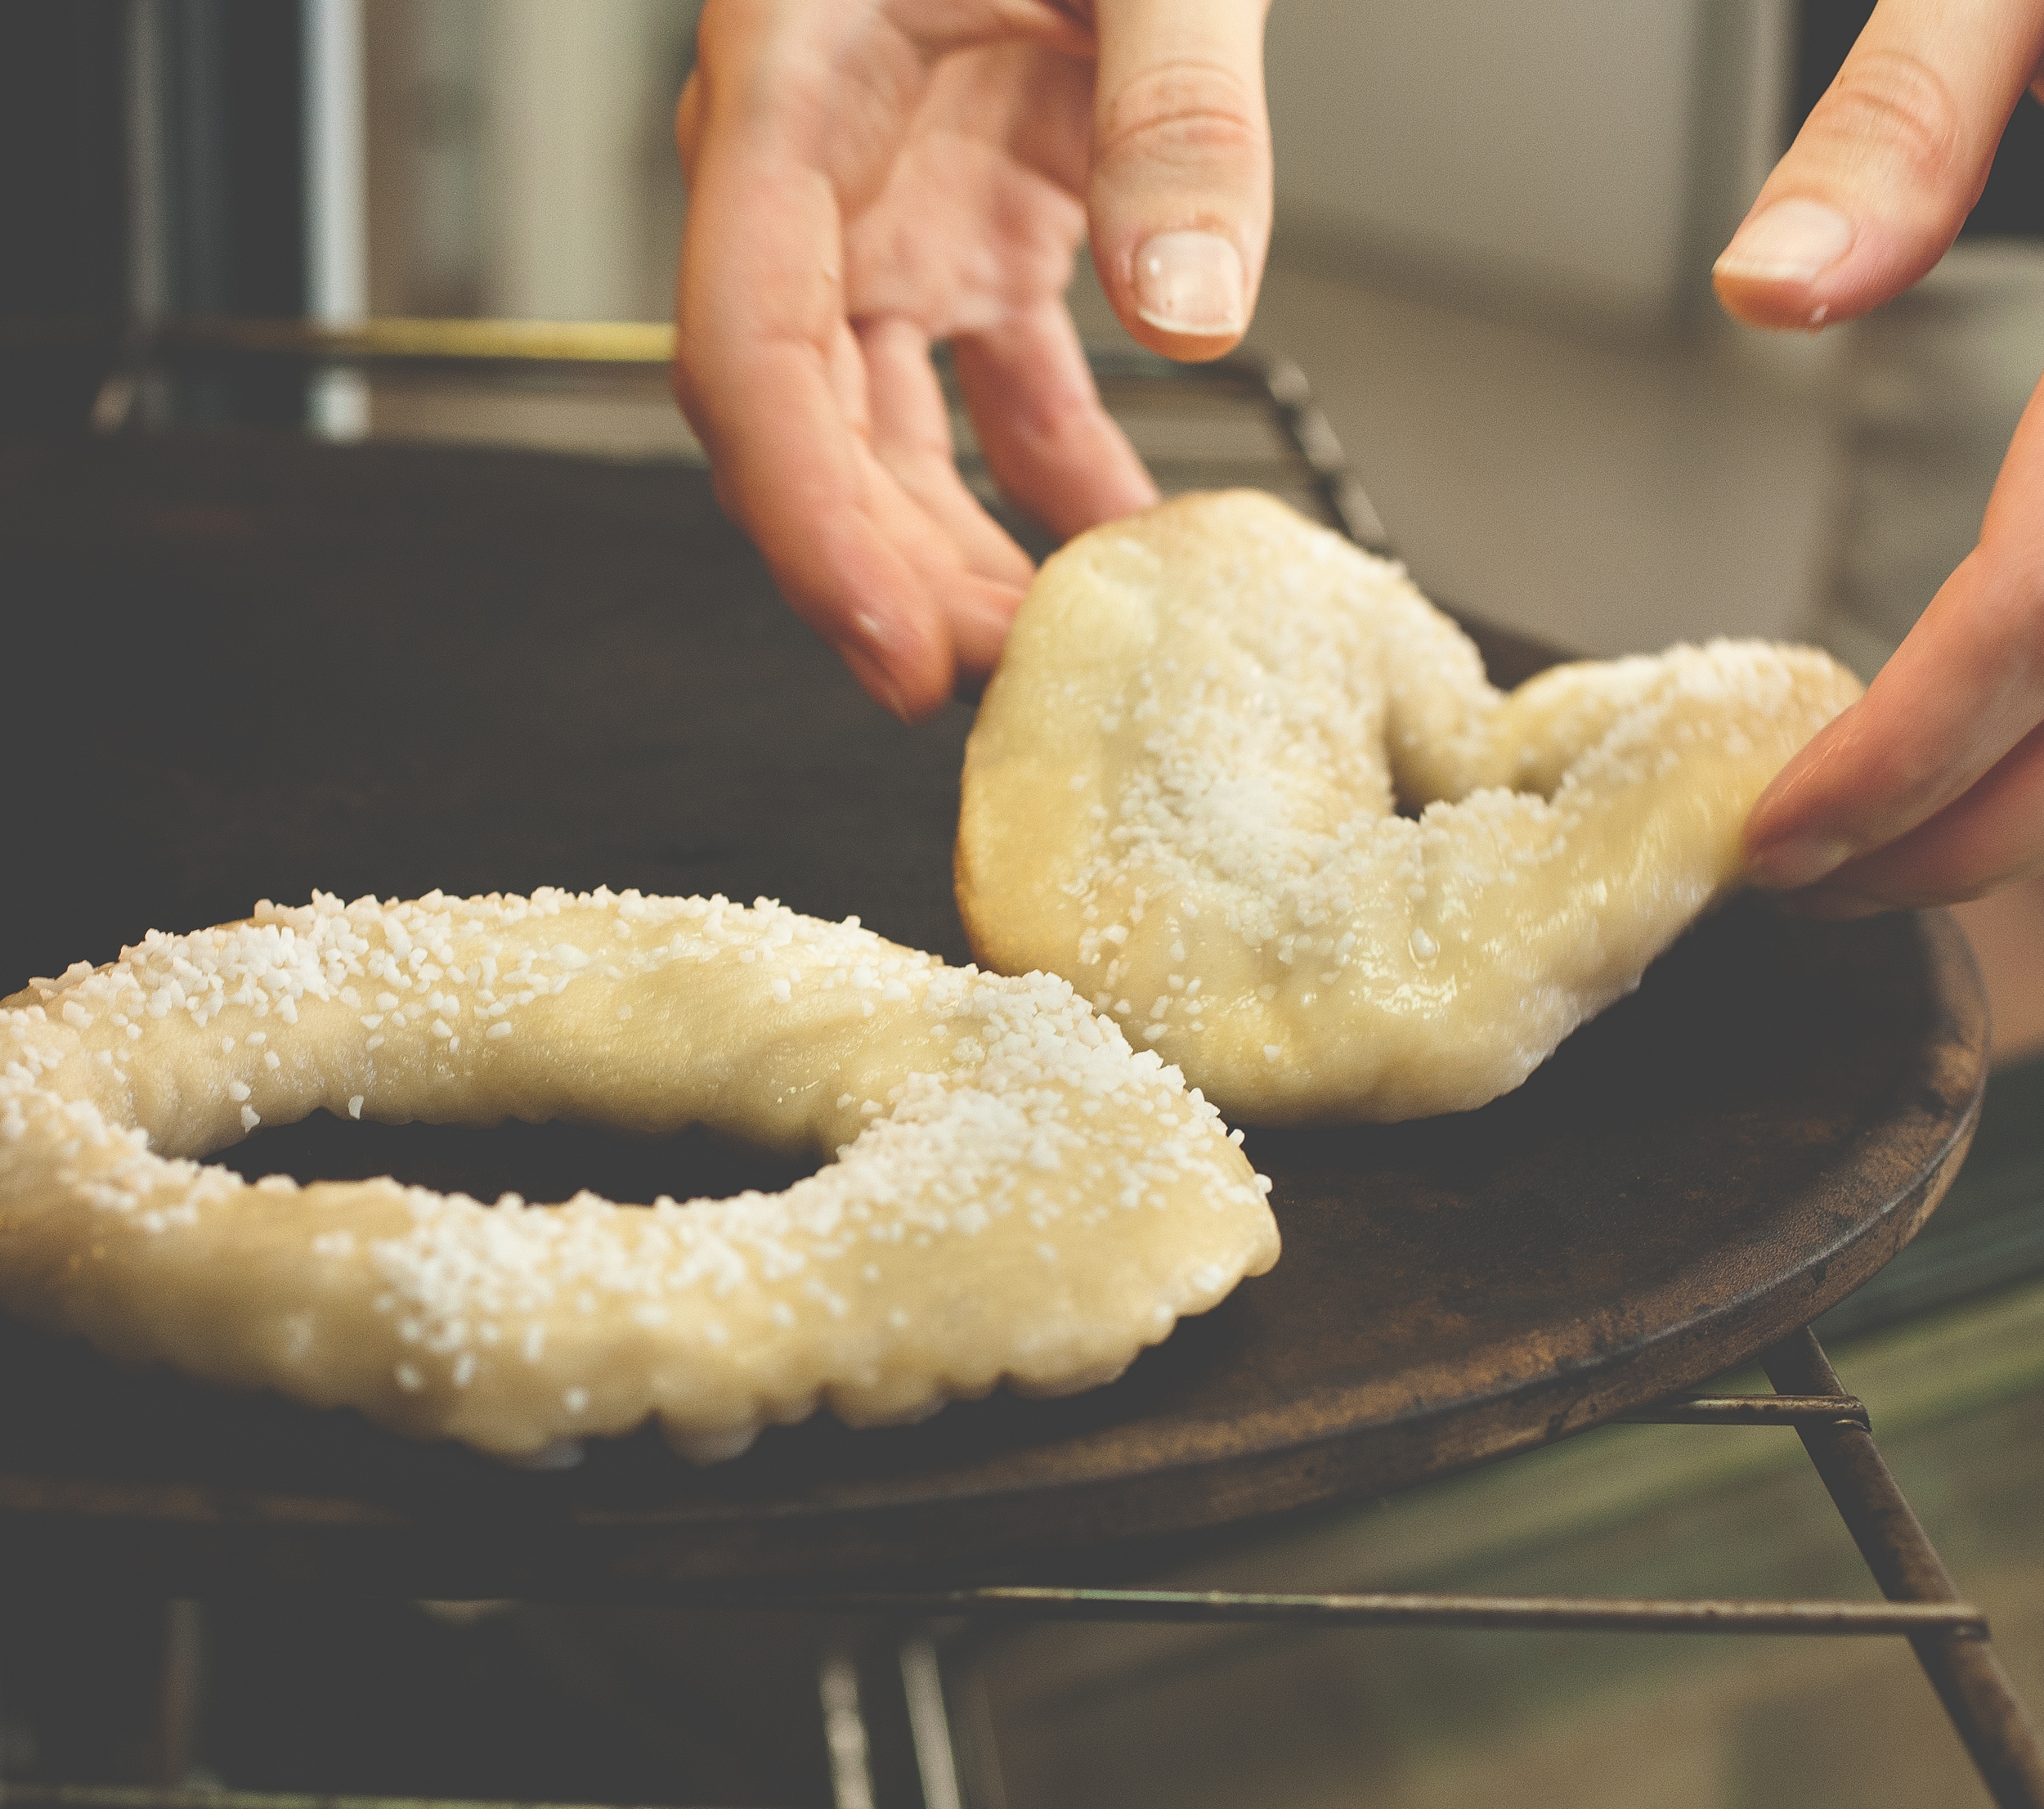
Next, roll one of the balls into a log, about the length of your hand. Connect the two ends. The bagel ring should be even in size. Here's the important part; bagel dough doesn't really rise, so be sure to shape the dough to how you want your bagel to look when it's cooked. For example, make sure there isn't a big gaping hole in the middle like mine! The shape of the dough should look like, well, a bagel pretty much. Repeat with the remaining dough balls and place on a baking sheet coated lightly with flour, cover with saran-wrap and place in the fridge for 12-18 hours. 

Produce On Parade - Homemade Bagels and What I Learned

Remove the bagel dough from the fridge. Preheat oven to 450 F, and if you have a pizza/baking stone, make sure it's in the oven to preheat as well. If you don't have one that's okay too. Bring a large soup pot of water (about 3 inches) to a roiling boil with 1 Tbsp. of the barley malt powder. Fill a large bowl with cold water. 

Prepare a wire cooling rack for the bagels to be placed on when they are done boiling. Prep any toppings you'd like in a few shallow bowls as well. One at a time, place the dough rings in the bowl of cold water. If they float, they're ready to boil. If not, check again in five minutes.

Produce On Parade - Homemade Bagels and What I LearnedProduce On Parade - Homemade Bagels and What I Learned
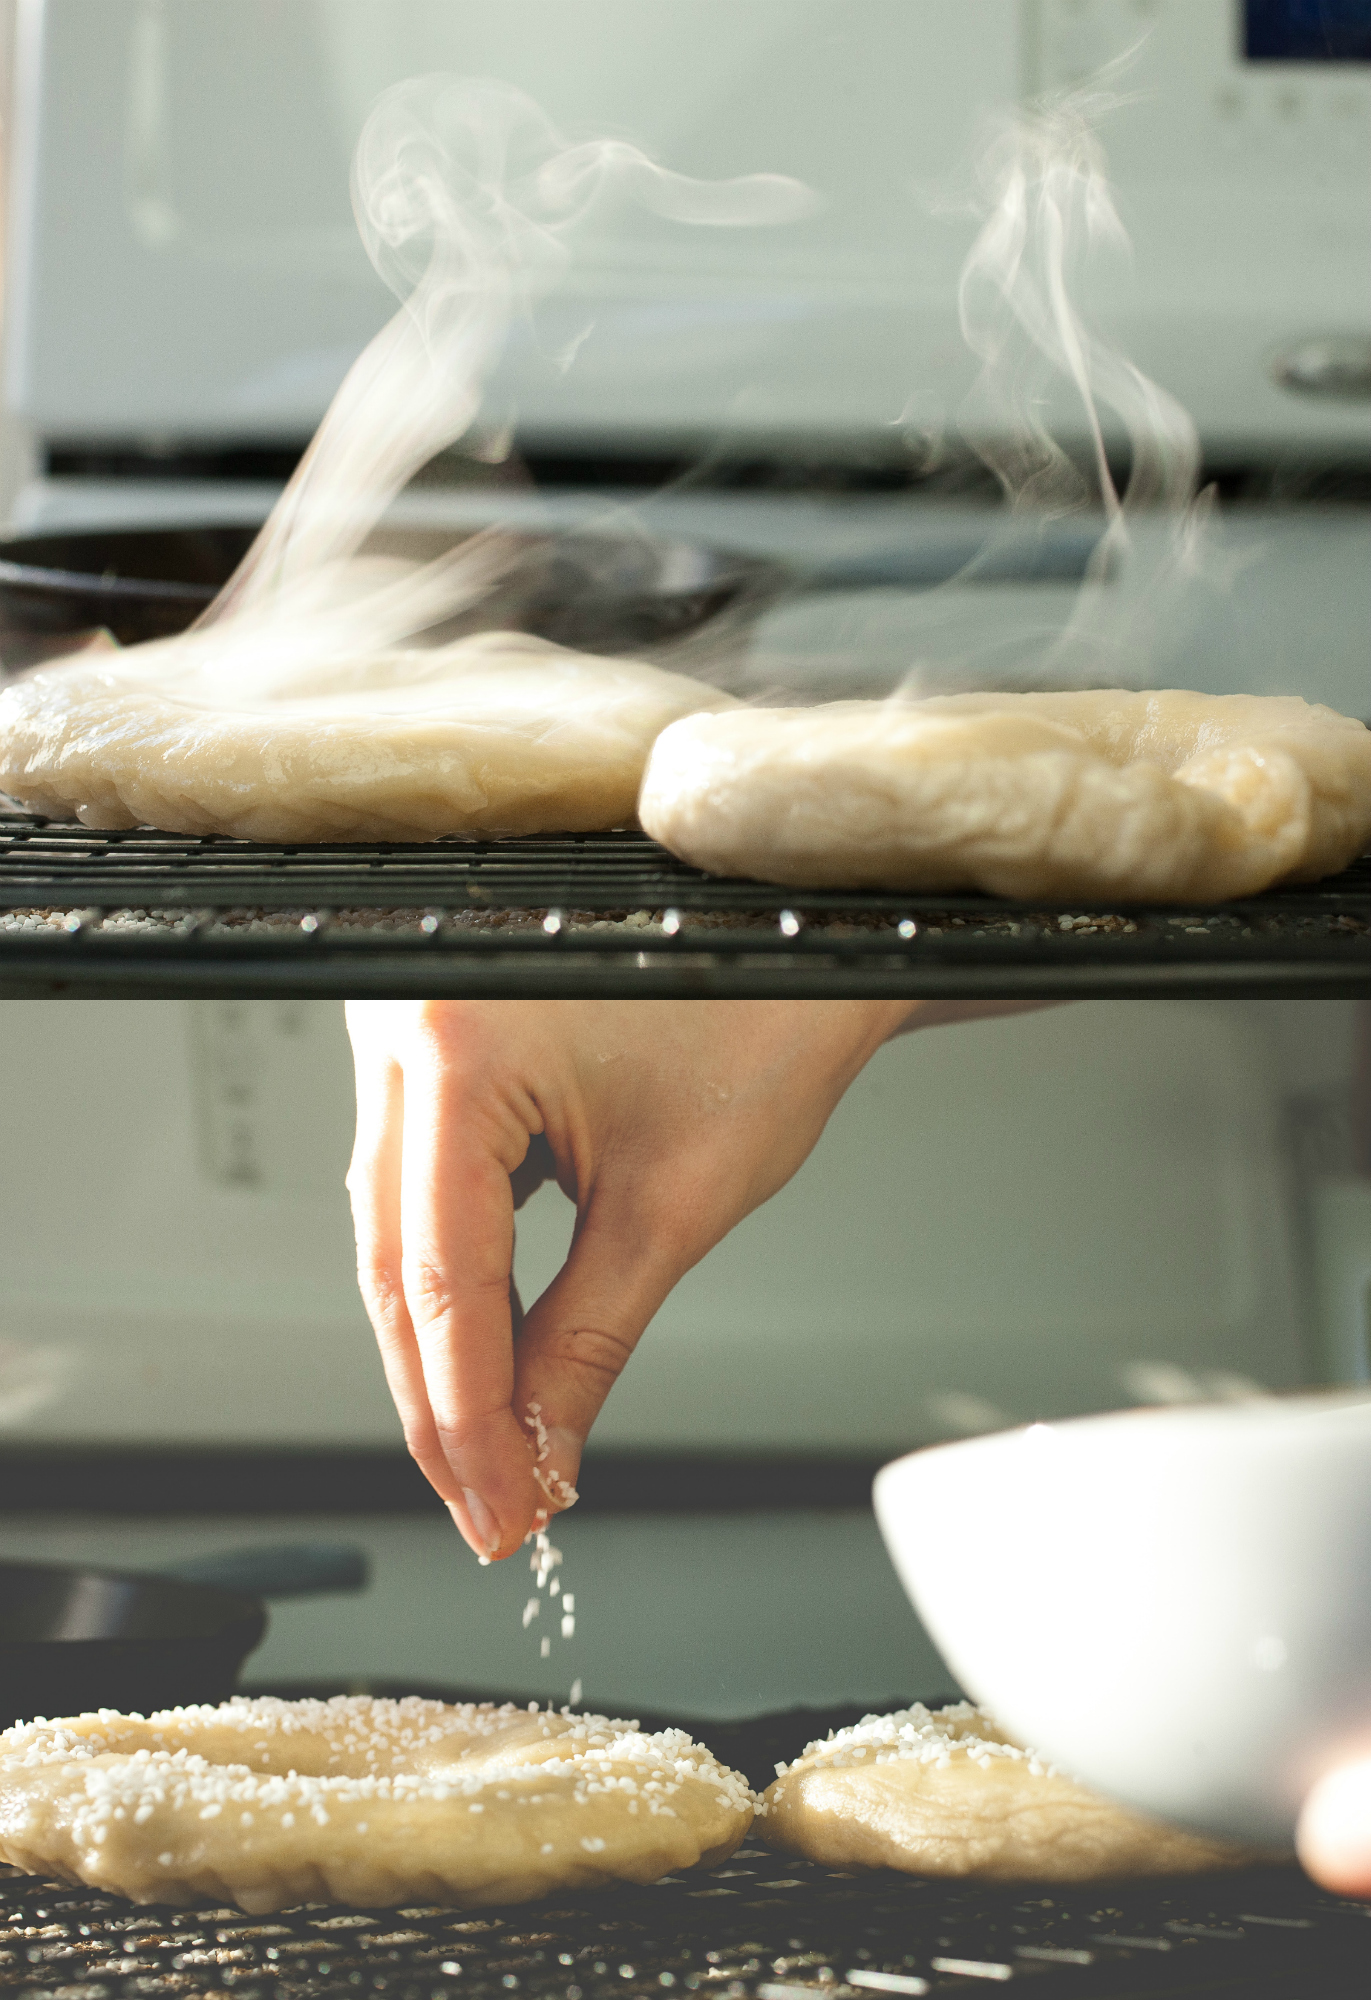
When the oven is to temperature, the water is boiling, and you have at least 4 ready to boil rings, go ahead and place four in the boiling water. Be sure to keep them submerged with a slotted spoon (as they should float), and boil for 30-60 seconds, or until they are slighted puffed. Remove with a mesh strainer...I don't recommend using two slotted spoons like I did! 

Produce On Parade - Homemade Bagels and What I Learned

Place the boiled bagels on a wire cooling rack and repeat with the other half of the batch. When they've all been boiled and have cooled slightly, coat the top in whatever toppings you'd like.

Produce On Parade - Homemade Bagels and What I LearnedThen, place all the bagels on the pre-heated pizza stone or on a baking sheet lined with parchment paper and bake at 450 F for 15 minutes.

Produce On Parade - Homemade Bagels and What I LearnedRemove from the oven and place on a wire rack to cool. Serve warm, and store in an airtight container. 

Produce On Parade - Homemade Bagels and What I LearnedProduce On Parade - Homemade Bagels and What I LearnedProduce On Parade - Homemade Bagels and What I LearnedGood deed of the day: Speak Out Against Walmart's Cruelty to Pigs. Why wouldn't you? You'll see my signature there! It only takes five seconds and ugh, Walmart, don't even get me started...

German word of the day: Bakery --> Bäckerei (pronounced: bake-er-rye) 

Listening to: [soundcloud url="https://api.soundcloud.com/tracks/58610816" params="color=73bd97&auto_play=false&hide_related=false&show_artwork=true" width="100%" height="166" iframe="true" /]

[yumprint-recipe id='83']Recipe slightly adapted from Cook's Illustrated, so you know it's good. 

Lessons Learned: How to Make Your Own Almond Milk

Ah, homemade almond milk. Produce on Parade: How to Make Almond MilkIt really is a completely different creature than the stuff at the store in the carton. I cannot explain how vastly superior it is...really just try it at least once. Homemade almond milk is creamy, rich, fresh and wholesome. It utterly incomparable to store-bought. No weird ingredients, chemicals, or preservatives, it can be made as thick or thin as desired and customized to be vanilla, plain, chocolate, or whatever!

Produce on Parade: How to Make Almond Milk

This is not a new concept. There are many, many posts on how to make almond milk. They're all pretty much the same, with varying degrees of almond to water ratio. However, when I was embarking on making homemade almond milk, I never found a post with in-depth personal tips...and I kind of wish I had. But, my mistakes are yours not to make, so here we go! This is a very comprehensive how-to, so feel free to read or take whatever tickles your fancy. No obligations.

Recipe first and lessons after.

Homemade Almond Milk

Makes ~8 Cups

  • 8 cups lukewarm water
  • 2 cups raw almonds
  • any additional add-ins (salt, dates, vanilla, etc.)

Place almonds in a medium bowl and fill with water until about one inch above almonds. Cover with cling wrap and refrigerate at least 8 hours, overnight or a workday. When ready, drain almonds and rinse well. Fill the blender with 4 cups of lukewarm water and then roughly half the almonds.

If vanilla almond milk is desired, this is the time to add 2-4 pitted dates, 1/2 tsp. of salt and 1 tsp. vanilla extract. Blend on high for a minute or so. If reading directions isn't your thing and you fill the blender with all 8 cups of water at once and then the 2 cups of almonds, they'll fit fine. However, while blending away in almond milk bliss, a frothy mess will seep out from the top and all over your blender, counter, etc. and you will cry. And you'll have a huge mess to clean up. Just...don't do it okay? Do it in two batches. Trust me. I did this for real and it was awful.

Produce on Parade: How to Make Almond Milk

Place nut milk bag in at least a 4 cup bowl. Pour the milk into the bag. Squeeze the bag at the top with one hand and gently, slowly squeeze the bag. I do this until it isn't bulbous anymore, then I work one had down, squeezing (imagine milking a cow) while the other stays put firmly holding the top of the bag. I do this until most of milk is out and then I squeeze all over the bag, sometimes I'll wring it lightly as well. Not all of the milk will squeeze out, that's okay.  Switch hands if one gets tired. The whole squeezing bit should really take less than five minutes.

[gallery type="rectangular" ids="283,282,281,280"]

Okay, now you have 4 cups of almond milk! Woot woot! Pour milk into a clean jar, pitcher or jug for storing. It sounds obvious, but make sure it holds at least 8 cups. The tighter the seal, the better.

Regarding the almond pulp in the bag. Hold the end of the bag with one hand and the top closed with the other. Shake to loosen the pulp. Empty the pulp into a small ziplock bag or jar to place in freezer to use at a later date. Or if the pulp will be used soon, it should last in the fridge for just a couple of days. Don't you dare throw out that pulp. Don't do it. I'm watching. There are loads of recipes using almond pulp. I plan to make some in the next coming weeks!

Now, repeat the process with remaining water and almonds.

Omg. Homemade almond milk! Awesome. Give yourself a pat on the back. The milk will separate in the fridge after a little while. Do not be scared of this, it is normal. Just shake it up before pouring and you're good to go!

Produce on Parade: How to Make Almond Milk

On the almonds

  • - Raw almonds work best. They lend the most "milk". Roasted almonds will make a darker milk and the taste will be...(surprise!) roasty. I personally prefer the raw, hands down. Experiment to find out what you like. In the pictures I happened to use half raw and half roasted almond because I ran out of the raw!

On soaking

  • - I find it easiest to soak the almonds before leaving for work and then when I return home, I'll make the milk in the evening. If I soak them overnight night, I don't get to them until the evening after work and that's a little too long. However, if you'll be home then it would work beautifully  I'll sometimes do this on the weekends.
  • - I soak the almonds in a pyrex 4 cup glass measuring cup, it's also what I use when squeezing out the almond milk. It just makes one less dish to bring out and wash!

On flavoring

  • - I don't flavor mine in batches because I like to use the milk in recipes and the like. However, I will frequently add a splash of vanilla, and a dash of salt, sometimes even matcha to a tall glass and stir it up when I want vanilla milk. Delicious!

On the bag

  • - I did have to get my bag online. It's Alaska, what else am I going to do? I found mine here and I think it does a fine job. Apparently...I had been using it inside out for quite some time. Only a week ago did I realize the seam goes on the outside of the bag! Hah! So, now you know.

On squeezing

  • - Don't pour cold-ass water in the blender. I know it's the logical thing to do, but, your hands will freeze when milking. I did this and it was horrible. Also, when I first starting making homemade almond milk I got super frustrated because the milking part was taking a lifetime, and I couldn't get ev.ry.drop.of.milk.out, and I felt like maybe I was damaging the bag. It took me a few times to realize that I was never going to get all the milk out and that was okay. I am now at peace with the squeezing bit and it doesn't take nearly as long. I was probably averaging like 2 minutes of squeezing per drop!
  • - Find what works well for you in terms of milking. It takes a few times to get the hang of it. I find it surprisingly soothing now...almost like therapy. Really!

On storing

  • -I purchased a hermetic refrigerator jug for storing my almond milk and I think it's definitely worth it. Hermetic just means it's airtight, so it will extend the life of the almond milk. Mine usually lasts about a week or just under. It will smell off when it's gone bad and it's only happened to me once. I was very surprised and terribly sad and I had to dump it out.

On cleaning

  • -Clean that shit out ASAP. I'm not even joking. You will regret it, I'm warning you. The bag's easy enough to clean, simply turn it inside out and rinse well, then hang to dry, that's it.

Produce on Parade: How to Make Almond MilkNow go make some sweet, sweet homemade almond milk. People will think you're badass. And you are.